photo Logo_JLC_small_zps4cfd28fd.png

About Me

My Photo
I am a simple person believing in simplicities of life. I love crafting and experimenting all sort of crafts- some I succeed and some come out to be total disasters...:P but i still love them all. I attempt to share my creations and crafty knowledge with you all and hope you enjoy your stay at my blog. Love all, Hate none is my way of living. If you like my work and wanna talk about it, I can be reached at justlovecraftsblog(at)gmail.com xx

Won Itsy Bitsy Tricolor Challenge

Won Itsy Bitsy Tricolor Challenge
Showing posts with label frame. Show all posts

Friday, August 31, 2012

Self Framed Shadow Box for Quilling - 2

Hello,

I hope you all remember my previous post about the framed shadow box for your precious quilled creations. For those who haven't seen it so far, you can find it here.

This is the second one in series I have prepared and is smaller than the other versions. 
Here it is - 
I have used an A4 size sheet to make the shadow box. The reason it appears smaller than the others is that the width of this frame is more than the other boxes I have made and is perfect to hold a pretty 3-D petal quilled flower.

The 'frame' is made up using a polka dot patterned paper from Primary Basics scrapbook paper collection.
I have added a little punched daisy flower made from a daisy craft punch with a rhinestone for that teeny weeney hint of bling (I seem to love a blingy effect on my creations! :P).
Here is a close up of my quilled flower. You can see a hint of bling here too :P. The flower has protected it well enough by the faux glass frame made from an acrylic sheet (OHP) and the patterned paper.
Simple and Effective??

Hope you like it. I will be uploading more shadow box frame designs with quilling inside. Keep checking the blog.

Linking it to the following challenges - 
1. Do More with Less 
2. Lulupu - The craft Lounge
Thanks all,
Just Love Crafts xx

Monday, August 20, 2012

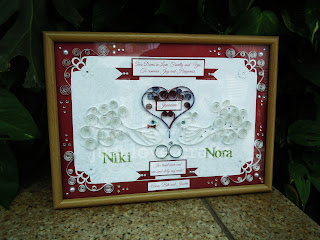
A Very Special project - Framed Card for a Wedding!!

Dear All,

I am really excited to show you this very very special project of mine. How is this special? Well, there are a number of reasons for that. 
Firstly, it was my very first commissioned order in Singapore. 
Secondly, This is the first time I made something like this. 
Thirdly, I had a total of 24 hours, that is one day to make this (including designing, framing, delivering.... everything). 
And finally I was actually successful in it as my client was very very happy which is what that made the whole process worthwhile. :)

Here it is, my first project of its kind-
Framed Final Version
It is an A4 size framed card to be gifted on a wedding. I was not sure if I will be able to manage everything in one day but I am glad it worked out as it has really given me that extra dose of confidence that I know I can accept a challenge like this again as well.
Unframed Version
It was very difficult to picture the framed version in the normal circumstances and even the unframed version couldn't be captured properly due to the shimmer of the background paper. But I was totally in love with this project and took loads of pictures. Of course can't put all, so here are a few more :) :) :)-
Wedding Rings
 My client wanted Doves, heart, rings, wine red and purple color and the messages to be written in both English and German so it gave me a fair idea of what all 'has' to be there. Now the task was to set up everything neatly and in a way that none of the component gets overshadowed by another.
Heart to be the main focal point and should be between the doves
 They wanted the word 'Jaaaaa!' in the heart. :)
The border
I did the borders at the very last moment. I was damn unsatisfied that being a wedding gift it got to be special and nice and nothing was clicking. Finally, during my brief sleep spell something clicked and I made the border as soon as I got up. (Subconscious mind does help!! :P)
Niki- The Groom
Our very handsome groom :)
Nora- The Bride
Pretty pretty bride with a beautiful necklace.
One last shot
This was taken a minute before it went to its new owner. I was kinda sad as I knew I might not see it again. It flew to Germany the very same night. The 24 hours I spent making were certainly stressful, not because I could not make it, but because I wanted to make them perfect. 
However, I do realise that perfection is not easily achieved and it does have its share of flaws but the happiness I saw on the faces who took this away was more than perfect and that just made this perfect.

P.S -Though I am the maker of this entire project, I wish to express my thanks to all my amazing contemporary crafter friends who have always shared their awesome creations inspiring each other in more than one ways. Thank you all very much :)

Lots of love :)
Just Love Crafts xx

Thursday, May 24, 2012

Quilled Cross as a gift!!

Ni Hao!!


I am just saying 'hello' in Chinese..:P..Well, if you are living in a country its good to know their language too..:P lol..well, I am not learning chinese, I just didn't want to start my post with a boring hello..and also, since this was the first craft project I did after coming to Singapore, I thought of giving it a little dramatic start..:D


So, here I would like to present a Quilled cross I made for our lovely landlady. Ever since I have reached Singapore, she had been a second mother to me. She welcomed me in her home with 'Aarti and sweets' and keeps gifting me something or the other every now and then. My hubby and me are like son and daughter-in-law to her. She is a devoted christian and I couldn't think of anything else to thank her for everything she did for both of us.
I have used 5mm pre-cut quilling strips for making this project. Since it was my first project in Singapore, I used the material I got from India and luckily I got a pack of these blue quilling strips which were perfect for this project. 


The frame I have used is from IKEA. I found a matching frame :D, inserted an A-4 size sheet in it and stuck the cross on it. 
Somehow the cross fitted the design perfectly and left me enough space to write a sentiment.
She just loved the gift and it is now displayed in their living room :) This is how the final piece looked once finished.


(Disclaimer- Please note that I am NOT the actual designer of this cross, I found an image on Google, loved the concept and remade it using my own size dimensions. The whole credit for the design goes to the actual designer - Sorry couldn't locate the designer. If you happen to be or know the designer of this beautiful cross then kindly contact me, I'll add the due credits to this post.)


Hope you like it.
Just Love Crafts xx

Sunday, November 20, 2011

A special gift!! - Quilled monogram in a handmade frame

Hey peeps,
I have got something special to share with you all. I said in my last post that I was busy making something for a very special friend. And I finally completed it. Well, it was supposed to be a gift and I intended to send it too. However, postponed the idea for a while because of our stupid Indian post. :( :(
Well, apparently they tried charging me so high for something which weighed less than 100 gms that I need to work out some other way to send it... 


Nevertheless that shouldn't refrain me from sharing this with you all. :)


Ok, so this is what I have made. Its a Quilled Monogram of the person's first letter of the name. here it is-
This is my first attempt at such kind of quilling and probably my biggest project too so far :p but I was surprised that it didn't take a lot of time. I finished this is 3 days working only a few hours on and off per day. I took approx. 2 hrs to make the frame from the scratch.


I am just unsatisfied with the base. I mistakenly used a printer sheet for the base, and so when a lot of glue was applied, the paper shrunk as can be noticed on the edges of the pattern. My advice is to use a thicker sheet or cardstock when making closed designs like these.


Would you like to see the step by step construction for it?? 

I have taken a few pictures explaining the process. Hope they help...


Firstly, I printed the monogram on a normal white sheet (printer paper). I found this beautiful design here


I outlined it with A4 length 3 mm dark blue strips. That's how it looked-
 I know it isn't really neat at this stage, but your flaws are easily hidden as the design fills. :p


I started to fill one portion at a time. i wanted to use normal quilling coils but in different shapes. I started with inserting the ones I already have in certain areas and filling one portion with heart shaped coils.
As I mentioned before, took me three days to finish the whole thing. That's how it looked at the last day.
Its an A4 size sheet at the moment but I wanted to frame it and thus, I cut off about 1.5 cms each from top and bottom margin. 


I searched for framing ideas all over the internet but didn't find anything satisfactory till I checked out Ina's blog and I found this amazing idea. I can't thank her enough for putting up such simple and clear instructions and the results are really satisfactory.
This is how my frame looked before assembling-
I had followed Ina's instructions exactly and it turned out to be perfect. However, I made one more mistake of using pastel sheet for the frame. Basically, I was too lazy to go to the market to buy some good paper for framing and thus, settled on the one I had at my disposal. Well, the frame turned out to be fine, but while assembling I faced the problem of sticking the ends properly. As the corners kept falling apart unless I fed enough glue. Never mind but, the frame looked nice once completed.
This is the final look of my framed quilled monogram-
I hope you like it. If there are any questions you would like to ask me regarding making this, please feel free to ask me. 
Thank you
Just Love Crafts xx

Similar Posts

Related Posts Plugin for WordPress, Blogger...