photo Logo_JLC_small_zps4cfd28fd.png

About Me

My Photo
I am a simple person believing in simplicities of life. I love crafting and experimenting all sort of crafts- some I succeed and some come out to be total disasters...:P but i still love them all. I attempt to share my creations and crafty knowledge with you all and hope you enjoy your stay at my blog. Love all, Hate none is my way of living. If you like my work and wanna talk about it, I can be reached at justlovecraftsblog(at)gmail.com xx

Won Itsy Bitsy Tricolor Challenge

Won Itsy Bitsy Tricolor Challenge
Showing posts with label hearts. Show all posts

Monday, August 20, 2012

A Very Special project - Framed Card for a Wedding!!

Dear All,

I am really excited to show you this very very special project of mine. How is this special? Well, there are a number of reasons for that. 
Firstly, it was my very first commissioned order in Singapore. 
Secondly, This is the first time I made something like this. 
Thirdly, I had a total of 24 hours, that is one day to make this (including designing, framing, delivering.... everything). 
And finally I was actually successful in it as my client was very very happy which is what that made the whole process worthwhile. :)

Here it is, my first project of its kind-
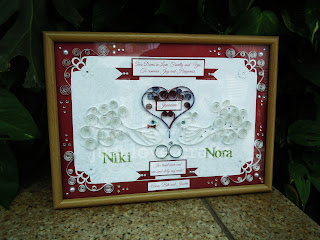
Framed Final Version
It is an A4 size framed card to be gifted on a wedding. I was not sure if I will be able to manage everything in one day but I am glad it worked out as it has really given me that extra dose of confidence that I know I can accept a challenge like this again as well.
Unframed Version
It was very difficult to picture the framed version in the normal circumstances and even the unframed version couldn't be captured properly due to the shimmer of the background paper. But I was totally in love with this project and took loads of pictures. Of course can't put all, so here are a few more :) :) :)-
Wedding Rings
 My client wanted Doves, heart, rings, wine red and purple color and the messages to be written in both English and German so it gave me a fair idea of what all 'has' to be there. Now the task was to set up everything neatly and in a way that none of the component gets overshadowed by another.
Heart to be the main focal point and should be between the doves
 They wanted the word 'Jaaaaa!' in the heart. :)
The border
I did the borders at the very last moment. I was damn unsatisfied that being a wedding gift it got to be special and nice and nothing was clicking. Finally, during my brief sleep spell something clicked and I made the border as soon as I got up. (Subconscious mind does help!! :P)
Niki- The Groom
Our very handsome groom :)
Nora- The Bride
Pretty pretty bride with a beautiful necklace.
One last shot
This was taken a minute before it went to its new owner. I was kinda sad as I knew I might not see it again. It flew to Germany the very same night. The 24 hours I spent making were certainly stressful, not because I could not make it, but because I wanted to make them perfect. 
However, I do realise that perfection is not easily achieved and it does have its share of flaws but the happiness I saw on the faces who took this away was more than perfect and that just made this perfect.

P.S -Though I am the maker of this entire project, I wish to express my thanks to all my amazing contemporary crafter friends who have always shared their awesome creations inspiring each other in more than one ways. Thank you all very much :)

Lots of love :)
Just Love Crafts xx

Wednesday, July 11, 2012

Another two tone card!!

Hello everyone,


Presenting another two tone card after the first one in shades of pink n purple..I have tried a bolder combination this time...here it goes...
I am enjoying making two-tone cards a lot, however thinking of a generic color theme which will go with my kind of designing takes a bit of experimentation for me..but guess its just me..
I feel this card will go well for both genders...kinda 'HOT' combination...:D
Do tell me your views about this card.... :) :)
Just Love Crafts xx

Wednesday, May 2, 2012

A New card...A New trick too :D

I am feeling soo proud today...And that's coz I have kept my promise...Promise of putting up crafty posts soon and here I am, in less than 24 hours...soo happy!! :P
Well, I so hope that I continue with this promise of mine and hopefully don't take a Loooooong gap like last time :(
Anyways, I can always blabber later..Let's come straight to the point.. This is a card I came up with 2-3 days back while fiddling with the strips. Its primarily made of only 3 colors (blue, pink and red). Well, no special reason, just that I have been able to shred only 3 colors so far and my table seemed to be full so I thought of using some before shredding a new color...
Have a look

This is the first time I have used 'Construction Paper' for Quilling. Actually, I didn't have much of a choice as this is the only kinds which is available for my purpose.. I like this paper, its like that though its only 110 gsm, I find it much harder to shred as all the ends do not come out fine. But guess, I am not in a complaining position as of now as even after trying I couldn't find anything apart from this, so I'll just stick to it..


A close up-

Now, The title says 'A new trick too' so here is the trick that I would like to share with all of you. 
(Disclaimer- I am not sure if it's entirely new, it's just I haven't seen it before and the idea came to me out of sheer desperation!)
I wanted to 'raise' the level of the part that holds the sentiment and since I have literally just moved to Singapore I am lacking of all the essentials of crafting apart from the very basic ones.. So as expected I did not have the required foam tape which is generally used for such purposes. But I was soo desperate to finish the card that I had to raise the level of the sentiment strip by any means and Whoooshh!!! I saw my quilling strips lying right in front of me and I made 3 tight coils and stuck them to the back side of the sentiment card and placed the whole thing in its right position. 
A closeup to show what I actually did..
This is the final outcome, and you can notice the raised part too easily..
I believe no one can actually make out the difference by just looking from the top that I have not used foam tape for it. In fact, I happen to notice one more benefit..
When quilled coils are used in place of foam tape, the 'raise' is more discreet and firm, as foam tape tends to squish due to its softness, where quilled coils are sturdy and keep the card in place..


*Caution- Make sure the paper which is being used for the 2-D effect (my sentiment card in this case!!) is thick and sturdy in itself, the pink base here is 140 gsm and on top of it i have stuck the same blue piece as the strip color which is of 110 gsm making the whole thing quite sturdy*


Well, I seem to totally love this card for its simplicity and freshness. Here is one last pic I would like to share..:D:D
If you like it, do lemme know. Your appreciation is my motivation.


Love all,
Just Love Crafts xx

Similar Posts

Related Posts Plugin for WordPress, Blogger...