skip to main
|
skip to sidebar
Hello everyone,
Presenting another two tone card after the first one in shades of pink n purple..I have tried a bolder combination this time...here it goes...
I am enjoying making two-tone cards a lot, however thinking of a generic color theme which will go with my kind of designing takes a bit of experimentation for me..but guess its just me..
I feel this card will go well for both genders...kinda 'HOT' combination...:D
Do tell me your views about this card.... :) :)
Just Love Crafts xx
Heya all,
I was never confident of trying Beehive technique as such before for one project..I used to try making swirls with some leftover strips to get a knack of it..but this is my first project using this technique as such...Of course all thanks to Susan and Pritesh for inventing and promoting this technique...:) :)
Well, I wanted to make a card by incorporating quilling technique at the same time make it for the 'first' anniversary event...so I decided on making a big number '1' as the main motif on the card and simply added some patterned paper, ribbon and sentiment to it.
The beehive swirls I have pasted here are the ones I made during my practice and hence the assortment of colors and neatness in swirls.. :P
I tried to incorporate my friend's favorite color as the main backdrop and hence the purple color background, but plain purple was looking very odd, so to spice up the whole thing, I added a piece of gingham red pattern paper..
I am not sure how it has come out...yet to hear from my friend as she hasn't received it so far...
But please do let me know your comments/ views about the card...it helps me to improve :)
Loads of love..
Just Love Crafts xx
Hello,
This card was made for my hubby's colleague and friend of mine :). I asked her, her favorite colors and she told me - hot pink and cyan.
Both the colors are bright and cheery and I had to figure out a way to make both the colors stand out..this is what I came up with..
I know the stem is a little offset :( :(
Its a result of my impatience with my creations..but I loved the look of daisies.
The flowers look nice but I am really not liking the stem.. :(
please do let me know your views about the card.. It will help me do better :)
Love all
Just Love Crafts xx
Hello All,
Today I am in a mood for posting. This is my fourth post in a row and I am happy but touchwood before I get jinxed again and I stop posting for another month :P
I have been pondering over making two tone cards in Quilling for very long but never really put the idea on paper. But one evening, while randomly sorting out my paper stack, I saw these lovely girly complementary colors and I had to make something using both of them as main colors.
Anyways,
Let the pictures do rest of the talking..:P
Though we took dozens of pictures, I can't possibly put them all up :p. So putting just a few...
As usual, nothing fancy or elaborate, just a simple post with my simple creation. Comments welcome :)
Just Love Crafts xx
Hello friends,
The card I am presenting today is very special to me. Not that I have special sentiments to it, I am sentimental about all my creations anyway :P. I didn't know how it will turn out to be when I started it because I was making it from scrap strips. Remember in my older posts, how I started quilling after coming to Singapore with only 3 colors (red, pink and blue) of shredded strips and this project was supposedly a left over kinds. But on completion it looked pretty much wholesome and nice!!
I don't have much to write about it. Just loads of pictures to share...My sweetheart photographed it nicely for me and I am sharing the ones I liked..
Its a very simple, no fuss, happy go lucky card and I really love it...
Hope you like it.
As always your precious comments will tell me that...Do let me know how it came out..
Love all
Just Love Crafts xx
Hello,
This is something I made long time back, when I was in India waiting for my Singapore visa...This is a very simple but very efficient idea of making your own twine used in crafting. I was hunting online for best deals on twines (Baker's twine, Doodle twine or any brand) when I actually bumped into a tutorial which was on making your own twine. I saw the tutorial but didn't make it for a while. Much to my dismay that when I went back to search for the same tutorial I couldn't find it, but it was such a great idea that I had to share it with my crafty friends.
And hence I decided to make my own following that mystery tutorial..:)
You need very basic things to make your own crafting twine-
A spool of thick cotton thread,
An old wide ruler,
Scissors,
Permanent markers in assorted colors.
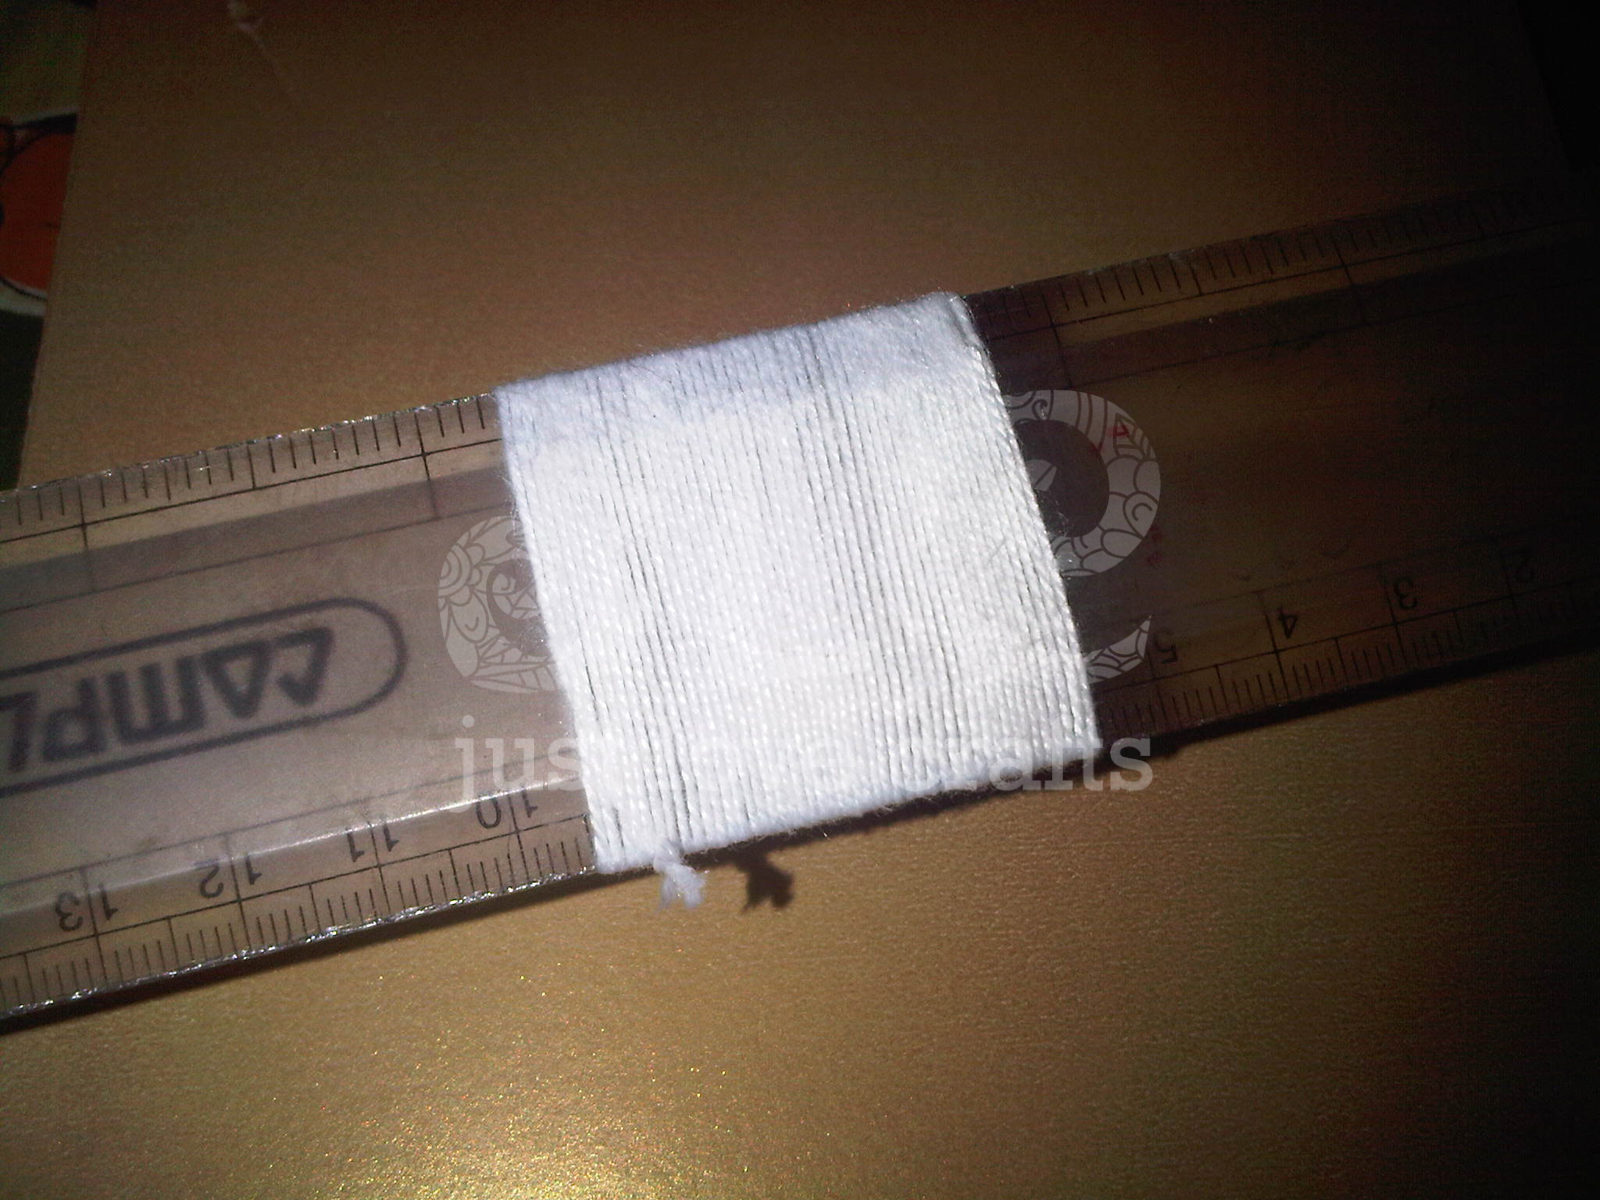
Measure a length of cotton thread (eg. 2 yards) or whatever length you need for your crafting project and cut it off. Wrap the whole thread tightly on an old ruler like this. Click on the picture to see closely.
After the thread is tightly secured on to the rules, take permanent marker of any color and start drawing lines diagonally (you can do straight as well but straight lines end up in diagonals anyway!). Make sure that that you make the lines with a slow and steady pace and allow enough time for the ink to penetrate the thread.
Make such lines on both sides. Keep it for a minute so that any wet ink will be soaked by the thread and the thread will be completely dried.
Start unrolling the thread slowly and see your handmade twine collecting in front of you.
I made it in two colors.
But unfortunately, before I could use it for any project, I got my visa and I started preparing for my departure. And in the rush of packing and reaching Singapore I left my twines in India only :( :(
Will collect them once I go back and will definitely use them for something.
But you can make it and use it for sure..This will specially help all the twine lovers. The whole spool hardly costs anything and all you need is a permanent marker in the color of your choice and you are good to go. :)
Please do let me know how you found this tutorial. Would love to get some reviews. :)
(Disclaimer- As previously mentioned, it is an inspired tutorial, NOT my brainchild. Did it for my crafty friends :) :))
Just Love Crafts xx
Hey Everyone,
Almost a month is gone. I guess I shouldn't get too happy about returning to my blog every time coz whenever I do that, blogging gets jinxed and I am not able to post at all..Not that I don't do crafting...I do and last month did quite a lot (~as per my speed and patience :P~) but have no idea what kept me from posting..Anyways...I'll straight get to the point and that is I made a quick and efficient earrings organizer..no rocket science...just something to help me find my earrings properly. The way my earrings were stored was a nightmare..Wanna see how it looked????
Have a look
Looks hideous!! Ain't it??
This picture was taken by my dearest hubby when while selecting a matching pair for my dress I accidently dropped the box on the floor and when I picked everything up (we all know how it is while you have to get ready, u r running late and your box of accessories falls on the floor!!!!) it was a nice entangled mess..
Hubby had quite a lot of fun mocking at the woman inefficiency of taking time to get ready coupled with such disasters and this picture was meant to be that mock reminder...
However, I didn't allow him much amusement as the very same evening I came up with this earrings organiser and he is quite happy that I could shut him up for this at least...:D :D :D
So over to the organiser..I save the cereal box cardboard by cutting the front and back biggest portion and discard the rest. I had few such lying with me..
I cut them off neatly by trimming off uneven edges and till I was left with neat rectangles. After that, I simply added these printed tapes on the border I had lying with me..I bought them in a stationery fair for really cheap...I guess a dollar or so for the whole set of 10 tapes...:D
After taping the borders, it looked nice, I didnt use a background paper or so as I wanted to keep the background plain so that my earrings stand out but you are free to decorate it as much as you like..I did't decorate either coz my earrings are embellishments in themselves.. lol..
Anyways, after reaching this step, I simply marked some lines with a ruler and made some holes using a compass and cork board and started placing my earrings as per their size...
After placing all the earrings, I just added small balls of blue tack at the back and placed them on a wall (blue tack doesn't spoil walls, so that's a bonus!!) next to my dressing table and its been more than a month and I have never had problems finding my earrings again..Plus it serves as quite a pretty wall art too...:D
I had fun making this, you can of course experiment in n number of ways and make sure your earrings are never lost or entangled again...:D
Let me know how it looks...Love all
Just Love Crafts xx


 I am enjoying making two-tone cards a lot, however thinking of a generic color theme which will go with my kind of designing takes a bit of experimentation for me..but guess its just me..

 I feel this card will go well for both genders...kinda 'HOT' combination...:D